
|
This tutorial demonstrates the basics of using Particle Combust 1.5. It requires Max 1.2 or 2.0. It will demostrate various aspects of Particle Combust such animated colors, density, and sizes and illumination.
|
|
|
To start with you need a particle system to use as a gizmo for your Particle Combust effect. You can use almost any particle system that Max uses. For now we will just use the Snow particle. Create a Snow Particle system that has a Width of 20 and Length of 20. Set the Life to 100 so we can get a larger particle volume and turn the Variation down to 1.0. Leave the Viewport and Render Count at 100 for now. The Render Count is an important factor to keep in mind, because the more particles you have the longer it will take to render. Now open up the Material Editor. Create a new material and turn on the Wire check box and set the Wire Size to 0.0f and assign the material to the particle system. The reason we want to do this is that we don't want to actually see the particle just the Particle Combustion effect. The reason we don't use a completetly tranparent material is that transparent materials interact strangely with volumetric effects(you see a lot of edge artifacting). Open up the Enviroment Dialog under the Render menu and Add a Particle Combust effect. The Particle Combust dialog should appear below. It is very similiar to the regular Combust effect. So if you are not familiar with Combustion you should take a look at the Combust help file. First we need to add the Snow Particle system to the effect. You do this by hitting the Pick Object button and then selecting the Snow Particle system which should show up in the drop down list next to the Remove Object button. Note there is a bug right now, if you want to delete an object from your scene that is in the effect list you must usethe Remove Object button first before deleting the object. The Color, Characteristics, Motion, and Explosion sections have pretty much remained the smae from the original Combust. So if you want more info on the fields in these sections check out the help file that came with Combust. The Illimnate and Particle Info sections are different and are used to further control the volume size and color. |
|
|
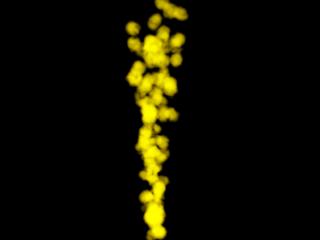
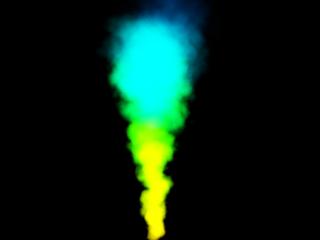
Now go to to Perspective view, go to frame 100, and do a Zoom Extents so you can see the whole particle system and do a render. You should have a yellow puffy looking stream of particles, not all that exciting. With the default setting the color of the effect is just the inner/outer color and will behave just like the regular combust but instead of being cirular it is based on paricles. |
|
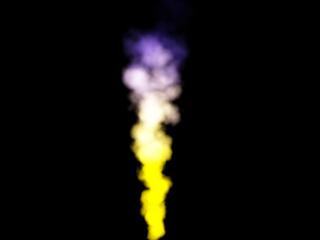
Scroll the Particle Combust dialog up until you see the Particle Info section which has most of the controls for how the particle effect will look like. Set the Particle Life 100, this field should normally be equal to to the life of the particle system. Turn on the Localize Explosion to particle life and Localize noise to each particle. The Localize Explosion to particle life links the color effect to the life of the particle when explosion is active. When the particle is born its effect color is the Inner/Outer color and when it dies it is the Smoke color. The Localize Noise centers the noise around each particle, instead of at the objects center. Normally Localize Noise looks better when turned on, otherwise the effect looks like it moving through a noise pattern instead of billowing. Turn on the Explosion check box in the Explosion section to activate explosion, set the Smoke Color to blue and do a render. A little more exciting but still lacking in control. |
|
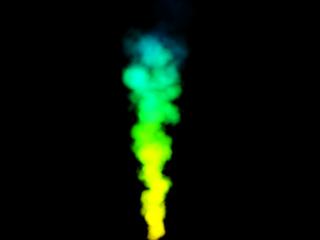
| Now we will examine how to localize effects to the particles life so we can more accurately control the effect. Scroll the dialog up to the Colors section and turn on the Inner and Outer Based on Track View Graph. This check box links the particle color to the track view color based on the particles life and overrider the explosion. To demonstrate how this works turn on the Animate button and go to Frame 50 and set Inner Color to green, then go to Frame 100 and set the Inner Color to blue. Now do a render of frame 100 and notice how the effect goes from yellow, to green, to blue. When the render goes out to shade the particles with Inner and Outer Based on Track View Graph it gets that particle age and then looks at the Inner Color track view graph and uses the color at the point on the graph based on the age. |
|
|
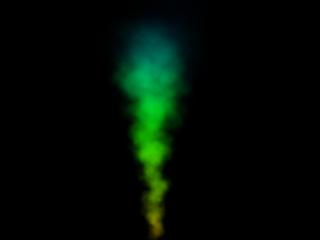
Just like you can control the color through the track view you can also control the size of the effect. Go back to the Particle Info section and turn on the Use Track View Graph check box. Now lets make the effect size bloom as they age. Turn on the Animate button and go to frame 20. Set the Particle Size to 25, then go to frame 100 and set the Particle Size to 100. Now render the scene and notice how the effect get largere at the end. |
| Since we made the effect larger it hs become more dense, no lets set the density just like we did the size. Turn on the Animate button and go to frame 0. Set the Denisty to 5.0 then go to frame 100 and set the Density to 1.0. Now do a render. You can continue to tweak the settings until you get the effect that you are looking for. |
|
|
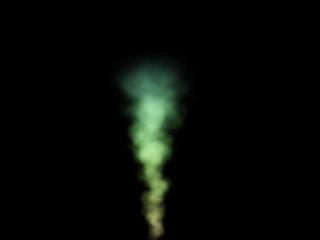
Normally Particle Combust is self illuminated and does not need any lights to see the effect. This is fine for explosion type effects but for effects like smoke you need to have the effect illuminated for it to look realistic. To make the effect non self illuminating turn on the Illuminate check box. You also need add lights to the effect. First create an omni light centered on the base of the particle system. Turn on the attenuation and set the Far Range to the extent of the particle system and set the Near Range to half that distance. Now you need to add the light to the effect dialog by hitting the Pick Object button and selecting the omni light. Now when you render only the parts of the effect that are illuminated are rendered. You can also cast shadows into the volume effect by adding a shadow casting light into the effect. |